
Building a High Availability DNS Recursive Resolver Utilizing DoT
Why Do You Need a Highly Available Forward Resolver?
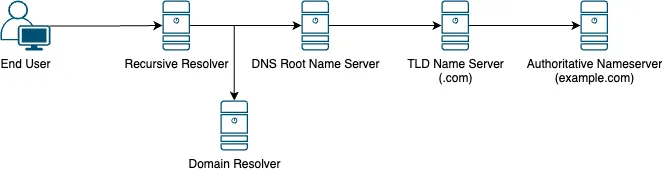
The domain name system (DNS) is the backbone of the internet. Acting like a directory, DNS is a critical service that translates human parsable domain names such as example.com into IP addresses 93.184.215.14.
At the heart of this system are 13 root servers which contain a list of all the domains in the internet 1.
The root servers themselves get these names from top-level domain, and authoritative nameservers. These servers are ran by domain registrars, so when you purchase a domain from a reseller you’re simply paying them to update the information stored in their servers so that when the root servers reach out to find a domain they get the information that you provided.

We’re concerned with the recursive resolver, or forwarder. That’s the part of our infrastructure that makes a request to the root servers, and returns it to your users. This is an extremely important part of the DNS puzzle and so it is the part that we want to have 0 downtime on.
Additionally, if you’re running on a domain you will have a domain server running DNS. Your computers will be configured to use these name servers to resolve domain addresses in your primary zone (your.domain.tld), as well as domains on the internet at large. This set up normally works well, but there are a number of caveats to keep in mind. I like to run separate resolvers for three important reasons:
- More control over load balancing and performance.
- If something goes wrong with the zone servers, you will still have internet access.
- As of now, the Windows DNS server does not support upstream DNS over HTTPS or DNS over TLS which can present some security concerns.
But Why?
DNS is required for almost all web functionality. Even several minutes of DNS downtime can be catostrophic. Additionally, slow DNS can cause many problems from long page loads, to login failure if on a domain.
We’re setting out today to set up a system which can resolve names quickly, reliably, and can be updated in place without downtime.
What is DNS over HTTPS (DoH)/DNS over TLS (DoT)?
Throughout the first part of this article we mention DoH and DoT. These are extensions to DNS that allows requests to travel over encrypted channels. Normal DNS is sent entirely in the clear, sites that you visit are known to anyone with the ability to capture packets on the wire (Your ISP for example.)
Securing DNS is important as it prevents information from leaking out. If someone finds out which websites you are visiting, there is a greater potential for targeted threats like spearphishing or spoofing–Therefore it is extremely important to ‘hide’ this information and make it more difficult for prying eyes to look at.
DNS over HTTPS allows for DNS responses to be returned over HTTPS, the same protocol that secures we traffic, while DNS over TLS is normal DNS that has the encryption built in to the protocol. DoH typically uses TCP port 443, and DoT uses TCP port 853 for traffic. For more information see this article from Cloudflare
Prerequisites
Today’s tutorial will be done on a Debian based host (Debian/Ubuntu). You will need:
- A dedicated host, separate from the rest of the network is best. A VM will work too.
- Shell access to the host.
- Docker, which can be installed quickly using the quickstart script here.
Creating Directories
First, we need to create the directories that we will store configurations in. For the purpose of this tutorial we will create the two following directories:
mkdir -p /srv/docker/dnslb-{traefik,unbound}
This will leave us with two directories in our new docker directory dnslb-traefik, and dnslb-unbound.
Enabling Swarm Mode
We will need to enable Docker’s swarm mode in order to perform load balancing and get high availability features. We can do this with the following command:
docker swarm init
This will change Docker into swarm mode and allow us to perform the next step.
Creating the Bridge Network
Next, we need to create the network that the DNS servers will live on, this is required specifically in swarm mode. This can be accomplished with the following:
docker network create --driver overlay proxy_network
Overlay networks are shared amongst hosts running in swarm mode. We only have a single host for now, but we still need to use some of the other features of overlay networks in order to get this working.
Create the Traefik Configuration
Create the following files.
.
└── srv/
    └── docker/
        └── dnslb-traefik/
            ├── docker-compose.yml
            └── traefik.yml
docker-compose.yml needs the following in it.
services:
  proxy:
    image: traefik:latest
    networks:
      - proxy_bridge
    ports:
      - 53:53
      - 53:53/udp
    volumes:
      - /var/run/docker.sock:/var/run/docker.sock:ro
      - /srv/docker/dnslb-traefik/traefik.yml:/traefik.yml:ro
    deploy:
      mode: replicated
      replicas: 2
      placement:
        constraints:
          # Traefik NEEDS to run on manager nodes only
          # it requires special docker api access.
          - node.role == manager
      restart_policy:
        condition: any
        delay: 2s
      update_config:
        order: start-first
        parallelism: 1
        delay: 10s
        failure_action: continue
        monitor: 60s
        max_failure_ratio: 0.3

networks:
  proxy_bridge:
    external: true
While traefik.yml needs the following content:
api:
  dashboard: true
  insecure: true

entryPoints:
  dns:
    address: ":53/udp"
  dns-tcp:
    address: ":53"

log:
  level: DEBUG
  format: json

providers:
  swarm:
    endpoint: "unix:///var/run/docker.sock"
    exposedByDefault: false
Now we should be able to pull the traefik container, while in the directory with our docker-compose.yml file, run docker compose pull this should pull the latest version of traefik. Once we’re sure that everthing is working we can start the container with docker stack deploy -c docker-compose.yml dnslb-proxy to start traefik in a detached state.
Creating the Unbound Container
We’re going to use the image from Matthew Vance. Create the following directory layout.
.
└── srv/
    └── docker/
        └── dnslb-unbound/
            ├── docker-compose.yml
            └── config/
                └── forward-records.conf
In our docker compose file paste the following:
services:
  unbound:
    image: mvance/unbound:latest
    networks:
      - proxy_bridge
    volumes:
      - $PWD/config/unbound.conf:/opt/unbound/etc/unbound/unbound.conf:ro
      - $PWD/config/conf.d/forward-records.conf:/opt/unbound/etc/unbound/forward-records.conf:ro
    deploy:
      mode: replicated
      replicas: 1
      restart_policy:
        condition: any
        delay: 2s
      update_config:
        order: start-first
        parallelism: 2
        delay: 5s
        failure_action: continue
        monitor: 60s
        max_failure_ratio: 0.3
      labels:
        - "name=unbound"
        - "traefik.enable=true"
        - "traefik.docker.network=proxy_bridge"
        - "traefik.udp.routers.dnslb.entrypoints=dns"
        - "traefik.udp.routers.dnslb.service=dnslb"
        - "traefik.udp.services.dnslb.loadbalancer.server.port=53"
        - "traefik.tcp.routers.dnslb.entrypoints=dns-tcp"
        - "traefik.tcp.routers.dnslb.service=dnslb"
        - "traefik.tcp.services.dnslb.loadbalancer.server.port=53"

networks:
  proxy_bridge:
    external: true
NOTE: Take special note of the
labels:element. Notice that it is underneath thedeploy:element, this is required for swarm mode containers, the labels will be read by traefik otherwise.
We also need to configure unbound. This image will automatically read specific mounted files, create the file config/forward-records.conf with the configuration below:
forward-zone:
    # Forward all queries (except those in cache and local zone) to
    # upstream recursive servers
    name: "."
    # Queries to this forward zone use TLS
    forward-tls-upstream: yes
    forward-addr: 9.9.9.9@853#dns.quad9.net

    # Enable query caching
    forward-no-cache: no
NOTE: You can find a list of public DoT resolvers at dnsprivacy.org
Configure a resolver under the forward-addr: node. in the format ${ip_address}@${port}#${hostname} this specific format is required for DoT servers. We used Quad9 here in our example.
You can now start the container with docker stack deploy -c docker-compose.yml dnslb-unbound while in the directory with the docker-compose.yml file.
Testing it Out
Issue the command `dig google.com @127.0.0.1 +short" and you should get a list of IP addresses similar to:
142.251.163.113
142.251.163.102
142.251.163.100
142.251.163.139
142.251.163.138
142.251.163.101
Congratulations! You’ve got your resolver up and running, and now for the fun part. Run the command docker service scale dnslb-unbound_unbound=${x} where ${x} is the number of containers you want to spin up. You’ll see docker begin to start containers with output like this:
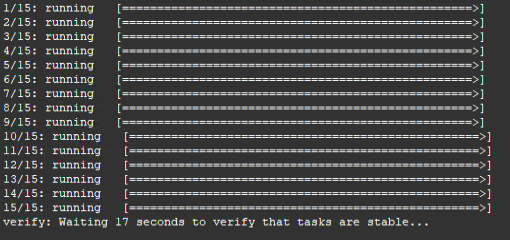
Play around with scaling and see just how many instances of unbound you can create! You might be surprised.
Next, set the DNS server on your computer to the IP of the machine we just set all of this up on. You should be able to access the internet–Congratulations, you are done!
Updating the Services
Since we’re using docker, updates are a snap. In order to update a service run the command docker service update --image=mvance/unbound:latest dnslb-unbound_unbound this will pull the latest container and begin a rolling update of the unbound service. While this is running, you should notice no difference in your internet browsing experience.
We’re Finished
Keep an eye out for the next article in this series, as we’ll be expanding upon some of the concepts. As always, happy hacking.